|
Check the following list and compare it with the results of your surveys to make sure that you are redesigning the grounds according to site conditions and the needs of the school community.
| Division of space |
Does your plan reflect the play and social
needs of children and have you divided the spaces equitably between grade
levels? |
| Reducing
Congestion |
Have you considered how localized congestion
around, for example, play equipment can
be reduced by increasing the level of
interest in wide open spaces that are currently little used?
|
| Play Equipment |
Have you planned to include a trail of
activities to give more children more play opportunities and to reduce the
congestion usually encountered in spaces with fixed play
structures? |
| Scale |
Have you observed children at play and
planned to create spaces that are more child-scale to increase their sense
of comfort and security? |
| Sense of place |
Are you planning to create spaces that help
develop in children a a sense of place
and a sense of belonging to a place, that children can become attached to,
observe and learn about on their own (listen to, smell, touch, watch bugs,
explore the soil, collect plant debris, find feathers, etc.)?
|
| Boredom |
Are you making the grounds more interesting
and providing children with a range of play, social and learning
opportunities? |
| Conflict |
Have you ensured that adjacent play or
social spaces placed are compatible with one another? How will new or
existing activities affect new or existing planted areas? |
| Noise |
Have you addressed children's requests for
quiet spaces by creating areas where children can get away from noise
and boisterous play? |
| Visual appeal |
Have you included in your plans ways to
make the outdoor environment more colourful year round by adding
murals, pavement paintings, etc.? |
| Comfort |
Have you considered how you can make the
school yard more comfortable by creating shade, windbreaks and spaces
where children can enjoy some privacy? |
| Fences |
How have you addressed the need to
reduce the prison-like aspect of metal fencing? Have you planned to green
up existing fencing or plant vegetation to screen unsightly views from
the schoolyard? |
| Shade |
Have you considered ways to create areas of
shade in several locations in the yard for quiet social spaces, outdoor
classrooms, and for children who like to watch others at
play? |
| Wildlife |
Have you ensured that wildlife habitat
projects are not placed next to active sports areas where they can be
damaged by stray balls and children running? |
| Seating |
Have you placed seating out of the way of
ball games and other activities? Are the shape and arrangement of seating
appropriate for what children want to do when using it? |
| Paving |
Have you ensured that loose materials such
as sand, wood chips, gravel, pea gravel, etc. in new play spaces and
plantings will not spill over onto paved areas and cause children to slip
and fall? |
| Garbage |
Have you planned to reduce lunchtime
garbage and regularly pick up litter that blows into the yard?
|
| Vandalism |
Have you included in your plans how you
will respond to any vandalism of your projects? |
| Siblings and friends
|
If your yard is segregated by grade, have
you consideredcreating special meeting places where siblings and friends in different grades can play and socialize together? |
| Drainage |
Have you assessed how rainwater or
meltwater flow will be affected by new projects? Have you planned to
include shallow swales to interrupt the flow of water and direct it
towards rather than away from new plantings? |
| All seasons |
Have you visualized what your school
grounds will look like during the Winter months and how your greening
projects will be both used and protected? Have you included creating
wildlife habitat for "outdoor classroom" use in Winter? |
| Snow storage |
Have you checked where snow is piled in Winter to make sure that snow and ice will not be pushed into your plantings? |
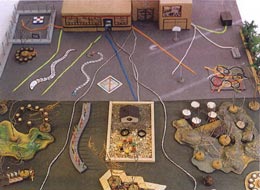
School Grounds in a BoxTM
The following
photographs show the different stages of building a model.
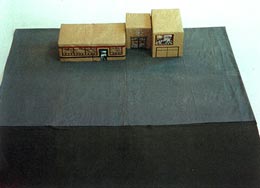
1. Checking the scale
Click to enlarge
|
Students can determine a scale that allows measurements to be easily calculated and transferred back and forth between the model and the site plan. They can measure the dimensions of the building and cut cardboard boxes to size to form the buildings and draw doorways and windows on the sides of the boxes and mark spaces where murals can be added. Fabric or carpeting can be used to represent the paved and grassed areas.
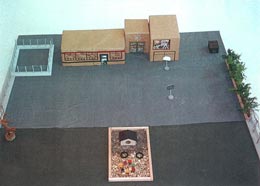
2. Adding existing features
Click to enlarge
|
Students can measure the size of existing features and determine their location on the site. To-scale models can be made of existing items such as garbage receptacles, play structures, kindergarten spaces, basketball poles and trees.
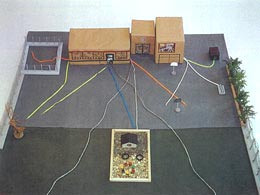
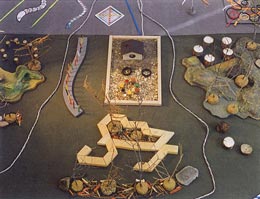
3. Marking the routes
Click to enlarge
|
Students can identify and record details on the routes and spaces used by people and vehicles. Learning about how people and vehicles use and traverse the site helps to avoid problems related to locating planting spaces on the desire lines or near where trees and other plants may suffer mechanical damage from vehicles. Coloured string can be placed on the grounds of the model to mark the routes used by pedestrians and cyclists, the main routes used by the school community between the doorways of the building and all destinations on the grounds and the major access routes and turning space allowances for grounds maintenance, emergency, delivery and waste collection vehicles.
4. Improving the fencing
Click to enlarge
|
Students can come up with ideas for making models of the existing fencing and ways to improve it such as growing vines up the support posts and attaching murals to sections of the fencing. They can measure the distance between the posts and the length of the fencing to determine the number of plants required, identify suitable species of vines and other plants and calculate the cost.
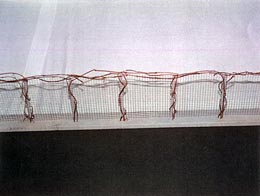
5. Making windbreaks and screening unsightly views
Click to enlarge
|
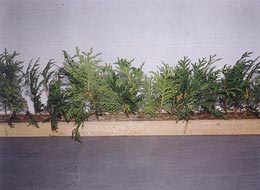
Students can determine the direction of the prevailing winds in Winter and design ways of creating windbreaks with conifers. Lengths of fencing and structures such as trellises can be made and moved about the grounds of the model to determine the most appropriate place for them. The model fence in this photograph was made by drilling small holes in a length of 1 X 2 wood and inserting cedar clippings into the holes. Growing plants on fencing can improve the aesthetics of the schoolyard, create pockets of shade, reduce windspeed, screen unsightly views from the yard and provide shelter for wildlife.
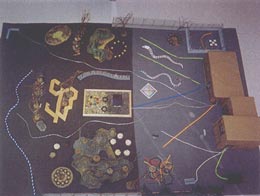
6. Placement of new projects
Click to enlarge
|
The people and vehicle traffic routes will help you place small models of proposed projects in locations where they will not cause conflict. If placing a planting project across a well-used route is unavoidable, students can design an interesting, clearly-marked pathway to guide people through the space.
7. Adding trees and seating
Click to enlarge
|
Once a space has been identified for use as a quiet, social area, students can work on designing tree-shaded seating arrangements that are built around the activities they wish to include in the quiet area. Various types of seating including stumps, logs, stones and benches can be placed in different locations on the model to help identify the most appropriate configuration and placement of the seating. Students can do research to identify the right plant for each planting location on the site.
8. Checking the shade and sight lines
Click to enlarge
|
Students can conduct a shade audit to find out how much shade is available to children at different times of the day. Once all the existing and new components are in place, students can use spotlights to simulate the sun's path throughout the day to ensure that the shade from trees and sun shelters will fall where it is needed. The sight lines can be checked by lying down on the ground to get a worm's eye view from different points on the model.
[ Back to top ]
|
)
)
)
)
)
)
)
)